All steps to succesfully send UDP messages
-
These are all the steps I performed to succesfully send UDP messages on my device.
Before you start:
- Turn your device off
- Do not send any messages before completing all the necessary steps in postman
- The manual is intended for people who have previously registered a CoAP device
- AT-Commands can be manufacturer and model specific. Refer to the datasheet for your device for the correct set of AT- Commands.
Postman:
-
Make sure you are logged into postman and have User SK0002 selected as your environment.
-
(UI) Get all devices. If you have previously registered your device for CoAP, you have to delete it first to use it for UDP. Make a call to: ‘(UI) Get all devices’ to find your device. Look for: “id”: 803 for example. If you have multiple devices, make sure you delete the correct one by comparing the IMEI number, it should be the same.
-
(UI) Delete device. Delete device with <id>: DEL {{base_url_cdp}}/rest/device/<id>.
(So not your IMEI!) See step 2 to find the id for your device. Return should be empty. -
Get resource subscriptions. Make a call to: ‘Get resource subscriptions’ If you have previously registered a resource subscription for your device you will have to delete that as well. Look for the subscription that shows your IMEI number, like this:
“serialNumbers”: [“IMEI:<your IMEI>”] -
Copy your subscription id. Select and copy (ctrl+c) the subscription id attached to your resource subscription. It should look like this: “subscriptionId”: “xxxx-xxxx-xxxx-xxxx-xxx”,
-
Delete subscription. Delete the subscription found in step 5. The API call you make should look like this: DEL {{base_url_idc}}/m2m/subscriptions/<subscriptionId>
Return should look like this:
{
“msg”: “Success”,
“code”: 1000
} -
Make sure everything is deleted. After completing steps 1-6, make a call to (UI) Get all devices and Get resource subscriptions. If you had only one device registered, these should now both be empty. If you had multiple devices registered, the device you deleted should not be in any of the lists.
-
Change the adaptation layer. We need to change the adaptationlayer to use UDP on our device. In postman, go to: manage environments -> User SK0002 -> adaptationLayerName -> It should be ‘TMNL_COAP_AL’. Change it to ‘TMNL_UDP_AL’.
-
Register your device for UDP. Make a call to: POST (UI) Register endpoint (Device)
{{DeviceId}}. Make sure you changed the adapation layer in step 8 before performing this step. Also make sure you are registering the correct device by checking the IMEI number in: manage environments -> User SK0002 -> DeviceId. The IMEI should look like this: IMEI:<your IMEI>. Important: do not use any spaces, this will register the wrong IMEI number. -
Register your resource subscription. Make a call to: ‘Register subscriptions: (resources)’. {{DeviceId}} should still be the same as the previous steps. Return should look like this:
{
“msg”: “Success”,
“code”: 1000
}
Register your application. Register your application by calling ‘Register application’. Your application should return a 200 (OK) response.
On your device:
- Attach to the network as usual. Make sure you are attached by using the AT- Command: AT+CGATT? This should return +CGATT: 1 if you are attached.
- Open a UDP socket. On the uBlox SARA-N211 modem the AT- Command is: AT+NSOCR=“DGRAM”,17,7000,1. ‘17’ = UDP protocol. ‘7000’ is the local port number.’1’ = incoming messages will trigger a +NSONMI URC. Opening a socket should return the socket number (0).
- Send a UDP message. On SARA-N211 the AT- Command to send a UDP message is: AT+NSOST=0,“172.27.131.100”,15683,4,“45726963”. ‘172.27.131.100’ is the T-Mobile CDP. ‘15683’ is the remote port number. ‘4’ is the data size in bytes. ‘45726963’ is the data. Sending a message should return the socketnumber and the amount of data successfully sent (0,4).
If you completed all steps successfully you should now be receiving data in your endpoint!
(If you have any questions, ask away!)
-
Hi Andre,
As promised:
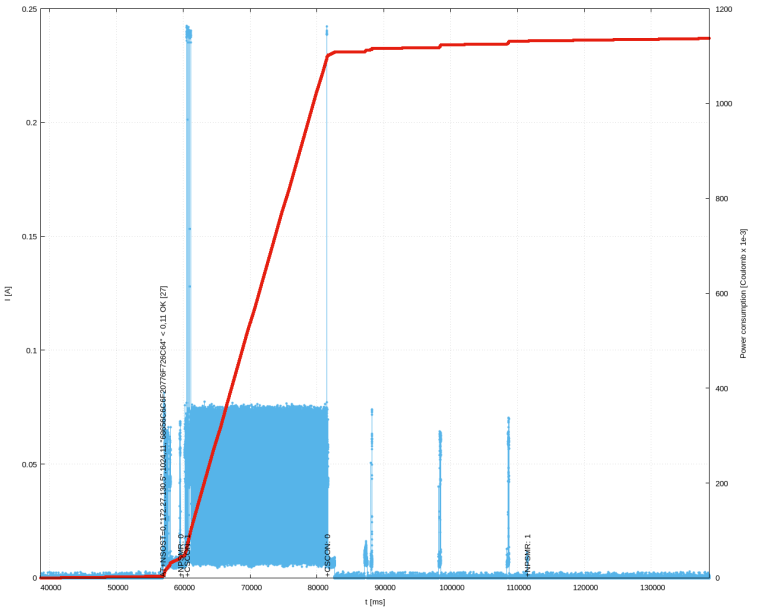
Send UDP message regular:
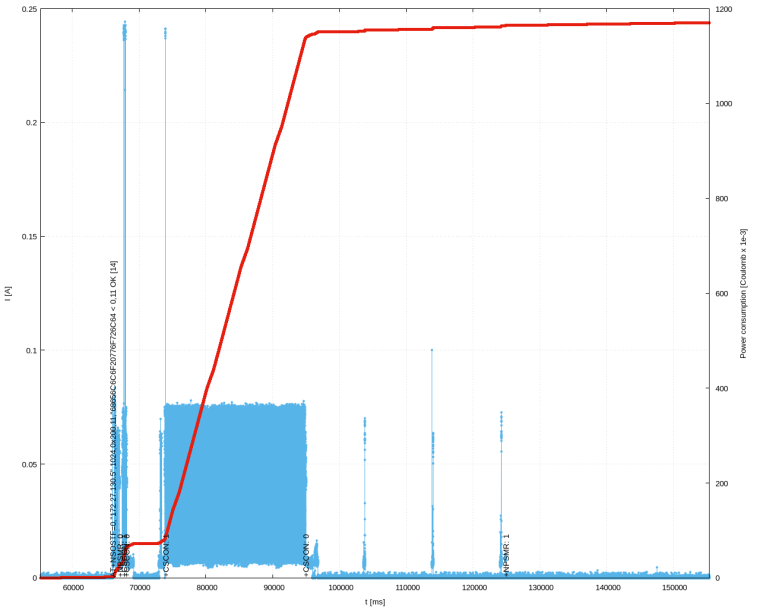
Send UDP message with early release:
-
@techniek Nice! Do you also have the zoomed-in screenshots? (just the TX peak). I also notice a large current spike when sending a message with fast release (second picture). What is this?
-
@Andre-Rodenburg Het heeft wat langer geduurd voordat ik eraan toe kwam maar heb de stappen gevolgd en het werkt zonder problemen
 op de BC68. Moest alleen wat AT-syntax aanpassen maar dat is logisch. Super bedankt voor het schrijven van dit stuk heeft mij veel geholpen.
 -
@thijsbuuron Heel fijn! Heb je toevallig ook al UDP release assist geprobeerd?
-
@Andre-Rodenburg Nog niet maar ga ik in deze dagen mee aan de slag. Zal mijn bevindingen hier delen.
-
@thijsbuuron hier zijn mijn bevindingen: Stroomverbruik minimaliseren